Most lifters are familiar with the lats—the large, fan-shaped muscles that cover much of the back. It makes sense, given that “latissimus dorsi” literally translates to the “broadest muscle of the back.” These muscles not only give your physique a wider appearance by filling the space between your rib cage and arms but also play a vital role in functional strength.
Strong, well-developed lats support your lower back and help transfer energy between your hips and shoulders during athletic movements. They’re also critical contributors to upper body pulling strength, making it essential for tasks like pulling yourself over an obstacle or controlling an opponent in grappling sports.
Everyone can benefit from a robust and substantial set of lats. You might already hit them with pull-ups and lat pulldowns—which are excellent exercises—but there are many other effective ways to target your lats with nothing more than a set of dumbbells. Here are the best dumbbell exercises to help you build solid and impressive lats.
5 Best Dumbbell Exercises for Lats
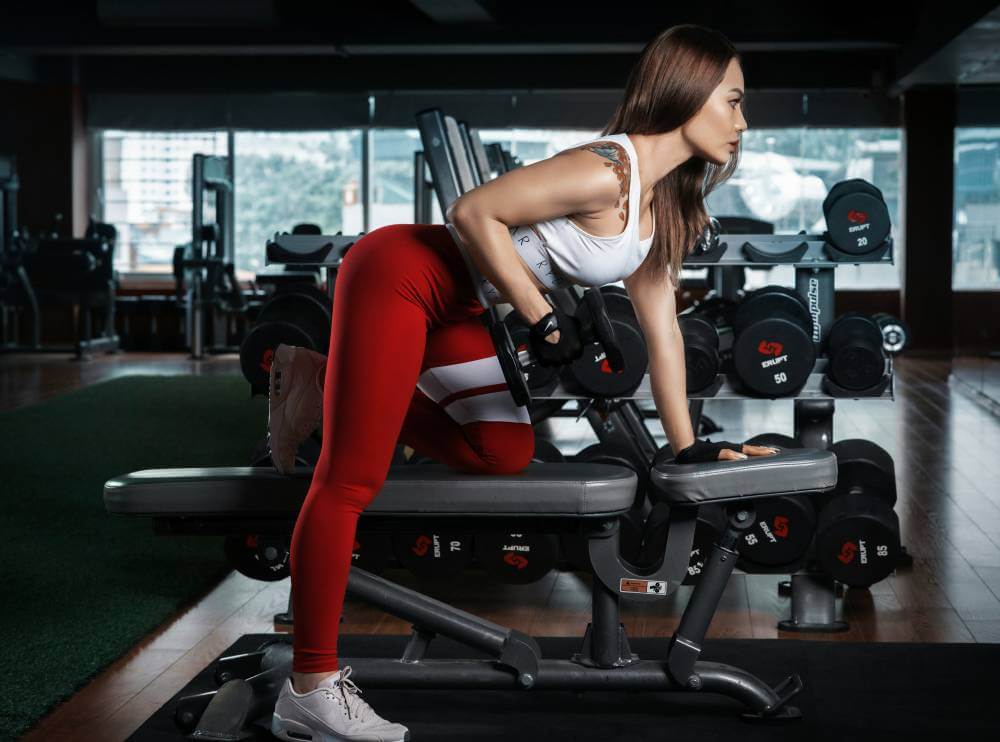
1. Bent-Over Dumbbell Row
Sometimes, the simplest exercises are the most effective, and the bent-over dumbbell row is no exception. This exercise stimulates the lats and other vital back muscles, including the rhomboids, traps, and spinal erectors. Additionally, it helps to reinforce proper hip hinge mechanics, making it a versatile movement that not only strengthens the upper body but also aids in improving lower body stability. The bent-over row is an excellent exercise for overall back development, offering strength and functional movement benefits.
Unlike the barbell row, which is often performed with an overhand grip on a straight bar, the dumbbell version provides more flexibility in grip and movement. With dumbbells, you can use a neutral grip (palms facing each other), which is easier on the elbows and shoulders, reducing strain on these joints. This makes exercise a better option for individuals with shoulder or elbow issues, as it allows for a more natural range of motion.
To better target the lats, focus on pulling your elbows straight back and slightly outward to engage the muscles more effectively. By directing the elbows outward, you shift the emphasis onto the latissimus dorsi, helping to maximize muscle recruitment. Additionally, pulling the elbows in this manner can enhance the stretch and contraction of the lats, leading to better muscle activation and growth.
How to Do the Bent-Over Dumbbell Row
Starting Position:
Stand upright with your feet hip-width apart, holding a dumbbell in each hand.
Bend forward at the hips, keeping a slight bend in your knees. Your torso should be angled at about 45 degrees, with your spine neutral and your chest up.
Let the dumbbells hang naturally from your shoulders, with your arms extended slightly in front of your knees.
Rowing the Dumbbells:
Initiate the movement by pulling your elbows back and toward the bottom of your ribcage. Focus on engaging your lats and pulling your shoulders back as you row the weights.
Keep your core engaged and your torso stationary throughout the movement. Avoid jerking your upper body or swinging weights to generate momentum.
Top Position:
At the top of the movement, the dumbbells should be near your ribcage, and your shoulder blades should be squeezed together to contract the upper back muscles fully.
Lowering the Dumbbells:
Slowly lower the dumbbells back to the starting position with control, allowing your arms to fully extend again without losing tension in your back muscles.
Form Tips:
Keep your trunk at a constant angle to the floor throughout the exercise, resisting the urge to lift your torso as you row.
Ensure that the movement comes from the shoulders and elbows, not the lower back or arms, to maximize lat engagement and avoid injury.
Perform the exercise correctly, ensuring that each rep is focused and deliberate to get the most out of your back training.
Benefits of the Bent-Over Dumbbell Row
Trains Glutes and Spinal Erectors: Maintaining the hip hinge position (bent forward) during the bent-over dumbbell row not only targets the upper body but also engages the glutes and spinal erectors. This position forces these muscles to stabilize your body throughout exercise, providing additional strength and endurance benefits for the lower back and posterior chain.
Improves Spinal Stiffness for Deadlifts: Rowing from a bent-over position demands greater spinal stiffness, which is critical for maintaining proper form in exercises like the deadlift. The bent-over dumbbell row is a great accessory exercise to strengthen the back, core, and posture, helping you build the rigidity needed to improve your deadlift performance.
Hamstring Flexibility and Stretch: Depending on your flexibility, maintaining the bent-over position can also provide a mild hamstring stretch. This gentle stretch helps improve overall hamstring mobility while training the back, making the bent-over row a multi-functional movement for flexibility and strength development.
2. Single-Arm Dumbbell Row
Similar to the bent-over dumbbell row, the single-arm dumbbell row provides a unique advantage by allowing you to use a larger stance and brace your non-working arm for additional stability. This bracing can be done by placing your free hand on your leg or a bench, allowing for greater control throughout the movement.
Because you’re only managing one dumbbell at a time, the single-arm row enables you to concentrate more intensely on the target muscles, including the lats, teres major, rhomboids, middle trapezius, and posterior deltoids (upper back muscles). This unilateral approach helps correct muscle imbalances between your left and right sides and allows for a more focused mind-muscle connection, which is crucial for effectively engaging the lats.
Concentrating on each rep’s contraction, the single-arm dumbbell row can enhance overall back development while improving muscle activation, especially in the latissimus dorsi.
How to Do the Single-Arm Dumbbell Row
Starting Position:
Place a dumbbell on the floor and take a staggered stance with your front foot positioned near the dumbbell. Your working arm will be on the opposite side of your forward foot—if your left foot is forward, you will use your right arm to row, and vice versa.
Body Positioning:
Lean forward slightly and brace your non-working forearm on your front thigh for support and stability. This will help you maintain balance and control throughout the movement.
Grip the Dumbbell:
Reach down and grab the dumbbell with your working arm using a neutral grip, meaning your palm should face toward your front leg.
The Rowing Movement:
Pull (row) the dumbbell toward your back hip while keeping your torso stable and your core engaged. Focus on using your lats and upper back muscles to drive the movement.
Keep your elbow close to your body as you row and avoid excessive shoulder rotation to maximize muscle engagement in the lats and upper back.
Lowering the Dumbbell:
Slowly lower the dumbbell back to the starting position, allowing it to stretch your arm to ankle level or just shy of it. Maintain weight control throughout the descent to ensure proper form and avoid jerking movements.
Form Tips:
Keep your spine neutral, and avoid rounding your back as you row.
Ensure the movement is smooth, and avoid using momentum to lift the weight.
Keep the focus on your lats and upper back throughout the exercise by squeezing the muscles at the top of the movement.
Benefits of the Single-Arm Dumbbell Row
Improved Form Stability: By rowing with one arm at a time and supporting your off-side forearm on your thigh, the single-arm dumbbell row helps to lock in good form. This support discourages hip extension, allowing you to isolate and focus more on your upper back and lats without compensating with other body movements.
Reduced Lower Back Strain: The unilateral nature of the exercise, combined with the off-side support, places less stress on the lower back. This setup decreases the activity of the lumbar erector muscles, which are typically more engaged in unsupported rowing movements. As a result, this exercise likely reduces extension forces and shear forces on the lower back, making it a safer option for those with back issues or individuals looking to minimize strain while still training the upper back effectively.
3. Dead-Stop Dumbbell Row
The dead-stop dumbbell row is akin to the barbell-based Pendlay row, with each repetition starting from a dead stop on the floor. This setup emphasizes building raw strength by engaging the muscles at full stretch, providing a powerful stimulus for muscle growth and strength development.
Like the Pendlay row and the traditional bent-over dumbbell row, the dead-stop row demands deep hip flexion and a reasonable degree of hamstring flexibility to maintain proper form. However, the key difference lies in its ability to offload the lower back between repetitions. While the bent-over dumbbell row keeps tension on the lower back throughout the set, the dead-stop dumbbell row provides a momentary rest for the lumbar region when the weight is reset on the ground. This makes it an excellent option for building back strength without overstressing the lower back.
How to Do the Dead-Stop Dumbbell Row
Starting Position:
Stand with two dumbbells placed slightly outside of your toes.
Assume a deep hip hinge position by bending at the waist, ensuring your back stays straight and your chest is up. To maintain stability, your torso should be nearly parallel to the floor, with a slight knee bend.
Grip the Dumbbells:
Reach down and grab the dumbbells with a neutral grip (palms facing each other). Your arms should be fully extended at the start, and the dumbbells should be positioned alongside your legs, just outside your feet.
Rowing Movement:
Initiate the movement by rowing the dumbbells alongside your thighs, pulling them toward your ribs. Focus on engaging your lats and upper back as you pull, keeping your elbows close to your body.
At the top of the movement, squeeze your shoulder blades together to maximize the contraction in your upper back muscles.
Dead-Stop and Reset:
After completing the row, lower the dumbbells back to the ground with control.
Allow a dead-stop on the floor, unloading the weight while maintaining your grip on the dumbbells. Pause momentarily at the bottom before starting the next repetition, ensuring you reset your position.
Repeat:
Once you’ve briefly paused and reset, initiate the next repetition by pulling the dumbbells back toward your ribs, maintaining proper form throughout the movement.
Key Tips:
Maintain a neutral spine throughout the exercise to prevent lower back strain.
Avoid jerking the weights off the floor—focus on using controlled movements.
Engage your core to support your back and maintain stability in the hip hinge position.

The dead-stop dumbbell row is excellent for building raw strength in the upper back while giving the lower back a brief rest between reps, making it a safe and effective exercise for overall pulling power.
Benefits of the Dead-Stop Dumbbell Row
Increased Muscle Recruitment: The dead-stop nature of this exercise—starting and ending in a stationary position on the floor—interrupts the stretch-shortening cycle (SSC) and eliminates the stretch reflex. This disruption reduces the use of momentum, forcing your muscles to work harder with each rep. Decreasing reliance on momentum, the dead-stop dumbbell row encourages greater muscle recruitment, particularly in the lats, rhomboids, and traps.
Stricter Form and Enhanced Starting Strength: The dead-stop row minimizes the passive recoil effect from muscles and connective tissues, requiring you to initiate each lift from a dead stop. This makes the movement more strict, as it prevents using elastic energy stored in the muscles. As a result, the exercise is more challenging, helping you to build starting strength—a critical aspect of movements that require power from a stationary position, such as deadlifts or cleans. This increased focus on form also helps you better engage the upper back and lats throughout the movement.
Joint- and Tendon-Friendly: Dead-stop exercises, like the dead-stop dumbbell row, tend to be gentler on the joints and tendons. This is likely due to the more gradual loading rates—since you’re lifting from a stationary position each time—and the lower absolute loads needed to create a significant training effect. This makes the exercise suitable for those looking to strengthen their back while minimizing strain on their joints, tendons, and connective tissues.
4. Cross-Bench Dumbbell Pullover
A staple of the “Golden Era” of bodybuilding, the cross-bench dumbbell pullover has experienced periods of popularity and decline. However, it remains one of the few true isolation exercises directly targeting the latissimus dorsi. Alongside straight-arm cable pulldowns, the pullover focuses on engaging the lats in a way many other exercises cannot.
The lats play a crucial role in moving the shoulder through a long range of motion, and while exercises like rows train the lats through part of this range, the cross-bench dumbbell pullover targets shoulder extension from an end-range position—when the arms are overhead. This makes it particularly effective for training the lats in their fully stretched position.
One of the most unique aspects of the pullover is that peak resistance occurs when your arms are fully overhead and parallel to the ground. In this position, the latissimus dorsi fibers are at their longest length, making the pullover an excellent exercise for stimulating muscle growth. Research suggests that training muscles at long lengths, such as in the pullover, can be highly beneficial for building muscle mass, particularly in the lats.
How to Do the Cross-Bench Dumbbell Pullover
Starting Position:
Position yourself perpendicular to a flat bench so that only your upper back and shoulder blades are supported on the bench.
Bridge your hips up, keeping a straight line from your knees to your shoulders by engaging your core and glutes.
Hold one dumbbell with both hands, gripping it at the top plate, and extend it above your face. Your elbows should be slightly bent and facing outward.
Lowering the Dumbbell:
Begin by lowering the dumbbell overhead, behind your head, in a controlled manner. Lower it as much as possible until you feel an intense stretch across your lats and chest. Keep your elbows slightly bent and locked in that position throughout the movement.
The goal is to achieve a deep stretch without letting the weight pull you out of proper alignment.
Pulling the Weight Back:
Pull the dumbbell back over your face, using your lats and chest to bring it up. Be careful not to lift the dumbbell too far; stop before your arms become vertical to keep constant tension on the muscles.
Maintain a slight bend in your elbows throughout the exercise to avoid shifting tension onto your triceps.
Repeat the Movement:
Lower the dumbbell back to the stretched position, pause briefly, and then repeat the motion. Keep your body in a bridged position to maintain stability throughout the exercise.
Key Tips:
Focus on feeling a deep stretch in your lats and chest at the bottom of the movement.
Keep your elbows fixed and slightly bent throughout the entire range of motion.
Don’t raise the dumbbell too high—stop short of vertical to maintain continuous tension on the lats.
Engage your core and glutes to stabilize your body while performing the movement.
Benefits of the Cross-Bench Dumbbell Pullover
Increased Lat Recruitment: By keeping your elbows slightly bent and flared outward throughout the exercise, you position yourself so that the dumbbell applies resistance to shoulder extension and internal rotation—both primary functions of the latissimus dorsi. This leads to greater muscle recruitment, making the pullover a highly effective isolation exercise for targeting the lats. The movement ensures the lats are fully engaged during the lowering and pulling phases, promoting strength and hypertrophy in this muscle group.
Enhanced Lat Tension Through Glute Engagement: The cross-bench position requires an isometric contraction of the gluteus maximus to maintain stability and keep the hips elevated throughout the movement. This provides bonus glute activation but also helps to enhance tension in the lats due to the force transmission between the glutes and lats via the thoracodorsal fascia. This connective tissue links both muscles. This connection allows the glute contraction to increase lat engagement, making the pullover more effective at targeting the back.
Improved Muscle Stretch: The pullover is one of the few exercises that allows the lats to be worked through a full range of motion, particularly in their most stretched position. Training muscles at longer muscle lengths is known to promote more remarkable muscle growth and flexibility, making the cross-bench dumbbell pullover highly beneficial for building mass and improving lat flexibility.

5. Kroc Row
Some exercises are ideal for lifting heavy, while others shine for high-rep endurance work. The Kroc row is designed to excel at both. This variation of the dumbbell row is all about pushing heavy weights and high repetitions simultaneously. Grab the heaviest dumbbell that you can handle—dust it off, and get ready to grind out sets of 15 or more reps. Lifting straps are often recommended to maintain grip and focus on lat engagement.
The Kroc row allows a small amount of “body English”—slight movement or momentum to help drive the weight. However, it’s crucial to stay disciplined and not overdo it. Excessive trunk extension or rotation will recruit muscles that are not the target of the exercise. To maximize the effectiveness of the Kroc row, the primary effort should come from the shoulder and latissimus dorsi. Minimal involvement of other muscle groups ensures the lats are the focus and receive most of the training stimulus.
Using a combination of heavy loads and high reps, the Kroc row helps build muscle mass and back endurance, making it a go-to for anyone looking to strengthen and develop their upper back and lats.
How to Do the Kroc Row
Setup:
Begin by setting up similarly to a single-arm dumbbell row, taking a split stance with the dumbbell placed near your front foot.
Brace your non-working hand on a sturdy bench or at the end of a dumbbell rack (just be sure not to block access to the dumbbells by positioning yourself to the side of the rack).
Grip and Positioning:
Strap into the dumbbell using lifting straps if needed for better grip, especially when going heavy.
Ensure your off-hand is braced securely to give you stability as you row.
Rowing Movement:
Accelerate the dumbbell upward, aiming to pull it toward the outside of your lower ribs. Engage your lats and keep the focus on pulling with your shoulder rather than rotating your torso.
A small amount of leg drive is acceptable to assist with heavy loads but avoid excessive trunk rotation or extension.
Lowering:
Lower the dumbbell back to the starting position in a controlled manner, resisting the temptation to let it drop too quickly.
Repetition Range:
Aim for high reps, no fewer than 15 per set, to maximize both strength and endurance.
Key Tips:
Keep the majority of the effort focused on your shoulder and lat muscles.
Use just enough momentum to get the weight moving, but avoid swinging excessively or using too much body English.
Brace your core and off-hand to maintain stability throughout the movement.
Benefits of the Kroc Row
Lat and Upper Trap Development: While the Kroc row is primarily a lat-building exercise, it also engages the upper traps, making it a compound movement that allows for heavier weights. The contribution from the upper traps enables you to move more weight over higher rep ranges, which helps build both size and strength in the upper back.
Heavy Loading with High Reps: The Kroc row offers a unique combination of heavyweight and high repetitions, something that’s rarely achieved in most rowing movements. This makes it an excellent exercise for building muscular endurance and power in the upper back, particularly for lifters looking to push their limits regarding volume and intensity.
Controlled Aggression: The Kroc row promotes a “controlled aggression” attitude, allowing lifters to channel energy into each set. The exercise encourages a more intense mindset, making it a great choice when you want to crank up the music and get into a focused, powerful lifting session. This mental engagement can lead to more productive workouts, fostering motivation and helping you push through tough sets.
How Often and How Much Should You Train Lats?
When you start training your lats regularly, you’ll notice significant improvements—not only in aesthetics but in overall strength. Well-developed lats can enhance your posture, improve clothes fit, and create a more secure foundation for major lifts like the squat, bench press, and deadlift. Additionally, you’ll develop a solid mind-muscle connection with these growing muscles, which plays a vital role in muscle growth and performance.
However, the critical question remains: how often should you train your lats, and how much volume is needed for optimal results?
Determining Training Frequency
A practical method to plan your lat training frequency is determining your lats’ total weekly set volume.
General Guidelines:
For fit individuals looking to build more muscle, experts recommend aiming for at least ten sets per muscle group per week. This is the baseline for effective muscle growth.
For more advanced lifters, performing 20 or more weekly sets may offer further benefits, provided they gradually build up to this volume to avoid overtraining or injury.
If you’re determined to improve your lats significantly, you could implement a higher-volume specialization program that focuses heavily on the lats. However, this increased volume should be incorporated gradually over time to allow your body to adapt and prevent strain.
Allocating Your Lat Sets
Once you’ve determined your target weekly sets, distribute them across your favorite lat exercises. Here’s how to approach it:
Example: A moderately experienced lifter aiming for 14 weekly sets to target the lats.
Exercise selection: Suppose this lifter prefers bent-over dumbbell rows, dumbbell-prone bench pulls, and pull-ups.
Set allocation: The lifter might aim for four sets of dumbbell rows, four sets of prone bench pulls, and six sets of pull-ups to hit the 14-set weekly goal.
Integrating Lat Training Into Your Split
The way you organize your weekly split will determine how you distribute these exercises:
Push/Pull/Legs Split (training six days per week): The lifter can spread the exercises across the two pulling sessions. For example:
Pulling session 1: Four sets of bent-over dumbbell rows and four sets of prone bench pulls.
Pulling session 2: Six sets of pull-ups.
Full-Body Routine (training three days per week): The exercises can be distributed across all three workouts, ensuring each session hits the lats:
Workout 1: Bent-over dumbbell rows.
Workout 2: Prone bench pulls.
Workout 3: Pull-ups.
Avoiding Overlap and Overtraining
Be mindful of how you sequence your lat exercises with other heavy lifts. For example, doing four sets of bent-over dumbbell rows the day before or after a heavy deadlift session might cause cumulative lower back strain. To avoid this, plan your workouts strategically and allow sufficient recovery for your lower back between demanding exercises.